Microsoft Word
How to Create an Index in MS Word [Beginner’s Tutorial]

Jan
In this tutorial, we look at how to create an index in MS Word. We also explain how to prepare your Word document before you start indexing, the correct way to index items, how to delete an index entry, and how to update the index after you have made changes. Ok, let’s start.
So, you’ve decided to create an index. Well, where do we start?
Creating an index has two steps:
- Marking the entries you want to add to the index
- Building the index
Before you start
Making a list, checking it twice… or three times or…
Jenny Watson, a technical writer living in Victoria, Canada, provides some excellent guidelines:
- Start with your topic headings — Add one or more index entries for each topic heading. Don’t forget to consider capitalization. As a general rule, use lower-case, except for proper nouns.
- Consider other words users might look for — For example, if the topic is about restarting the computer, you might add another entry under “reboot” for users that know that term.
- Look for keywords in each topic — These might include the names of dialog boxes or windows, or unfamiliar terms, for topics that include a definition of the term.
- Synonyms for the keywords — Consider your audience and terms they might be more familiar with.
- Brainstorm other words users might look for.
- Read the completed index.
As always, Czech for spelling errors, typos, and false friends.
In addition to this, consider the following when preparing the index:
- Where will the reader expect to find specific subjects? Find subentries?
- Consider the difference between main entries and subentries.
- Does the document contains new words that must be explained?
- Are special terms used? Are they used interchangeably throughout the document?
Planning your Index
Try to see your index as a single unified piece of content, not a lucky dip of words and phrases.
Remember, your index serves as a welcome oasis for readers who’ve become lost or stranded in a fiendishly difficult document and need to find their bearings.
So, before you race off and start hammering at the keyboard, give some thought to your readers.
How can you prepare an index that helps them find that missing link, that entry they bookmarked mentally… but not digitally?
Ask yourself:
- What is the most appropriate word or phrase for each entry?
- What terms or concepts do I need to capture as subentries?
- Do I need cross-references? Are they phrased correctly?
- Should I add a note to explain special points, such as italics page numbers refer to illustrations?
- Are forenames or initials needed?
How to Mark Index Entries
Ok, so you’re on board. You want to create an index. Well, let’s get into it.
You can mark words or phrases, or text that spans a range of pages, for your index.
- Select the text you want to use as an index
- Click the References tab, then Mark Entry.

Tip: you can also use Alt+Shift+X.
- Edit the text in the Mark Index Entry dialog box if you wish or leave it as it is.
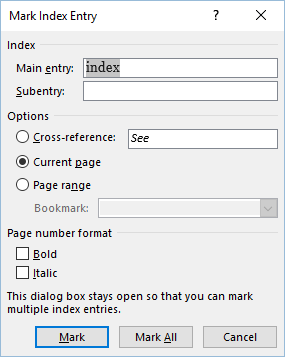
- You can add a second-level entry in the Subentry box if you want.
Note: To add a third level, add a colon to the Subentry - To create a cross-reference to another entry, click Cross–reference under Options, and then type the text for the other entry.
- To format the page numbers that will appear in the index, select Bold or Italic below Page number format.
- Click Mark to mark the index To mark this text everywhere in the document, click Mark All.
- To mark additional index entries, select the text, click in the Mark Index Entry dialog box, and repeat steps 3-7.

How to Format an Index
You can jazz up your index any way you want. It’s your creation!
However, as your readers may have certain expectations on how an index is presented, it might be best to err on the side of caution and offer a familiar index layout.
For example:
- Use lowercase for common nouns and noun phrases – e.g., economic theory; global warming
- Capitalize proper nouns as they are in the text – e.g., von Neumann, John
- Use italics for titles of books, songs, ships, legal cases – e.g., Rising Sun (ship); Alice in Wonderland; Brown v. Board of Education
Inserting an Index
After you have marked your entries, and compiled your index, you can insert it into the document:
- Insert two or three hard returns after the last word of text in your document and place the cursor after these spaces.
- Select one of the following depending on your version of MS Word
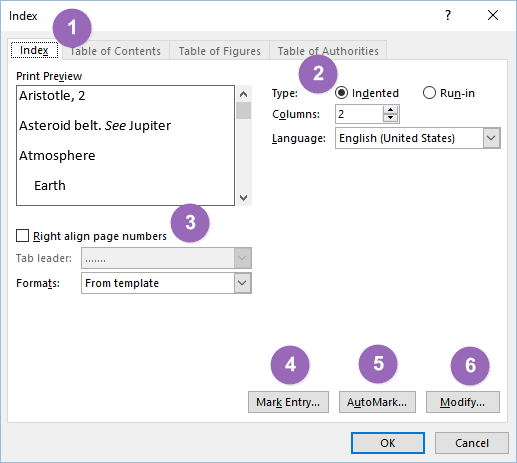
On the Insert menu, select Reference, and then select Index and tables. Word 2010.
On the Reference tab, select Insert Index. Word 2013.
- Click the Index Select Indented as the Type, Simple as the Format, and 1 as the Columns.
- Click OK and your indexwill compile and appear at the spot of your cursor.
- You may compile your index incrementally as you work to check the progression of your index’s structure and style.
Updating an Index
If you mark more entries, you’ll need to update the index to see them.
- Click the index, then
- Press F9 or click References, Update Index.

Note that the index must be selected in order for the Update Index option to be active.
Transposing Words in Indexes
Let’s say you’re indexing famous authors’ names. You start by indexing them first name, last name.
Then, you’ve a change of mind. Last name, then first name.
For instance, if you have tagged an entry as
Charles Dickens
But want it to read
Dickens, Charles
change the text in the index tag field manually or use Find and Replace.
For example, in Find what, type:
XE Charles Dickens
and in Replace with enter:
XE Dickens, Charles
Note the character space between XE and the opening quotes (). Recompile the index to view the changes.
Index Entries across several pages
Let’s say you want to index a range of pages in a long document.
- Select the range of text to index.
- Insert tab, Bookmark.
- In the Bookmark field, enter a one-word name for the Bookmark (no spaces) and click Add.
Note: the Bookmark name does not have to match the index entry or Subentry.
- Click at the end of the range of text you bookmarked. Do not highlight the range.
- Press ALT+SHIFT+X to tag the selection.
- In the Index dialog box, enter the indexterm as either a Main entry or Subentry; select Page Range; and choose your Bookmark from the menu.
- Click Mark to complete the tag.
Summary
Not every document needs an index. But some do. I’d suggest any document over 20 pages would benefit from an index.
Likewise, technical, financial, or scientific documents are all enhanced with an index.
It doesn’t replace Search, rather it complements it.