Microsoft Word
MS Word: How To Put Chapter Title In the Header or Footer
You can improve the quality of your Microsoft Word documents by adding useful information into the header and footers.
How To Put Chapter Title In the Header or Footer
If you want to put the Chapter title in MS Word’s header or footer, follow these steps:
1. Open Microsoft Word.
2. On the View menu on the main toolbar, click Header and Footer. If you can’t see this, click the small arrows at the end of the menu to show this option.
3. Click inside the header or footer that you want to change.
[Optional] On the Header and Footer toolbar, click ‘Same as Previous’ to break the connection between the header and footer in the current section and the previous section.4. On the Insert menu, click Reference, and then click Cross–reference.
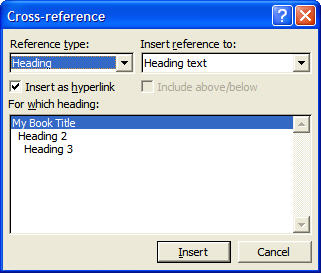
5. In the Reference type box, click Heading.
6. In the For which heading box, select the heading that contains the chapter number or title. In this example, it was My Book Title.
7. In the Insert reference to box, select what you want to insert in the header or footer.
For example:
Click Heading number to insert the chapter number, and then click Insert.
Click Heading text to insert the chapter heading, and then click Insert.
This adds the document name to the header or footer.
How to Get Started
A simple example is to include the Document Name or Chapter title in the footer. This helps the reader if they print out the document and also gives me a better sense of what they’re reading.
What you put in the header and footer can be used to remind the reader of what their reading and also to guide them through the document, especially with business proposals and marketing plans.
Something I’ve found very useful is to add the Chapter title to the footer. As the reader moves from one chapter to the next, the header or footer is updated dynamically.
It’s a small point but it looks well. It also reinforces to the reader that you know how to prepare a professional-looking business document.